Installing on Open Data Hub
This guide will walk through installing Open Data Hub and TrustyAI into your cluster. Starting from a completely blank cluster, you will be left with:
-
An Open Data Hub installation
-
A namespace to deploy models into
-
A TrustyAI Operator, to manage all instances of the TrustyAI Service
-
A TrustyAI Service, to monitor and analyze all the models deployed into your model namespace.
Environment Setup
-
Download the demo repository, which contains the various resource files you’ll need for the tutorial:
git clone https://github.com/trustyai-explainability/odh-trustyai-demos -
Navigate to the Installation tutorial directory:
cd odh-trustyai-demos/1-InstallationAll future commands within this tutorial should be run from this directory.
Cluster Setup
-
Make sure you are `oc login’d to your OpenShift cluster.
-
Create two projects,
$ODHand$PROJECT.These names are arbitrary, but I’ll be using them throughout the rest of this demo.
oc create project $ODH oc create project $PROJECT -
Prepare the
$PROJECTfor ODH’s model serving.oc label namespace $PROJECT "modelmesh-enabled=true" --overwrite=trueTo enable ODH’s monitoring stack,
user-workload-monitoringmust be configured.
Enable User-Workload-Monitoring
-
Enable user-workload-monitoring by creating the following
ConfigMap.apiVersion: v1 kind: ConfigMap metadata: name: cluster-monitoring-config namespace: openshift-monitoring data: config.yaml: | enableUserWorkload: true -
Apply the file using.
oc apply -f resources/enable_uwm.yaml -
Configure user-workload-monitoring to hold metric data for 15 days by creating the following
ConfigMap.apiVersion: v1 kind: ConfigMap metadata: name: user-workload-monitoring-config namespace: openshift-user-workload-monitoring data: config.yaml: | prometheus: logLevel: debug retention: 15d -
And applying it with.
oc apply -f resources/uwm_configmap.yaml
Depending on how your cluster was created, you may need to enable a User Workload Monitoring setting from your cluster management UI (for example, on console.redhat.com).
Install ODH Operator
-
From the OpenShift Console, navigate to
Operators>OperatorHub, and search forOpen Data Hub.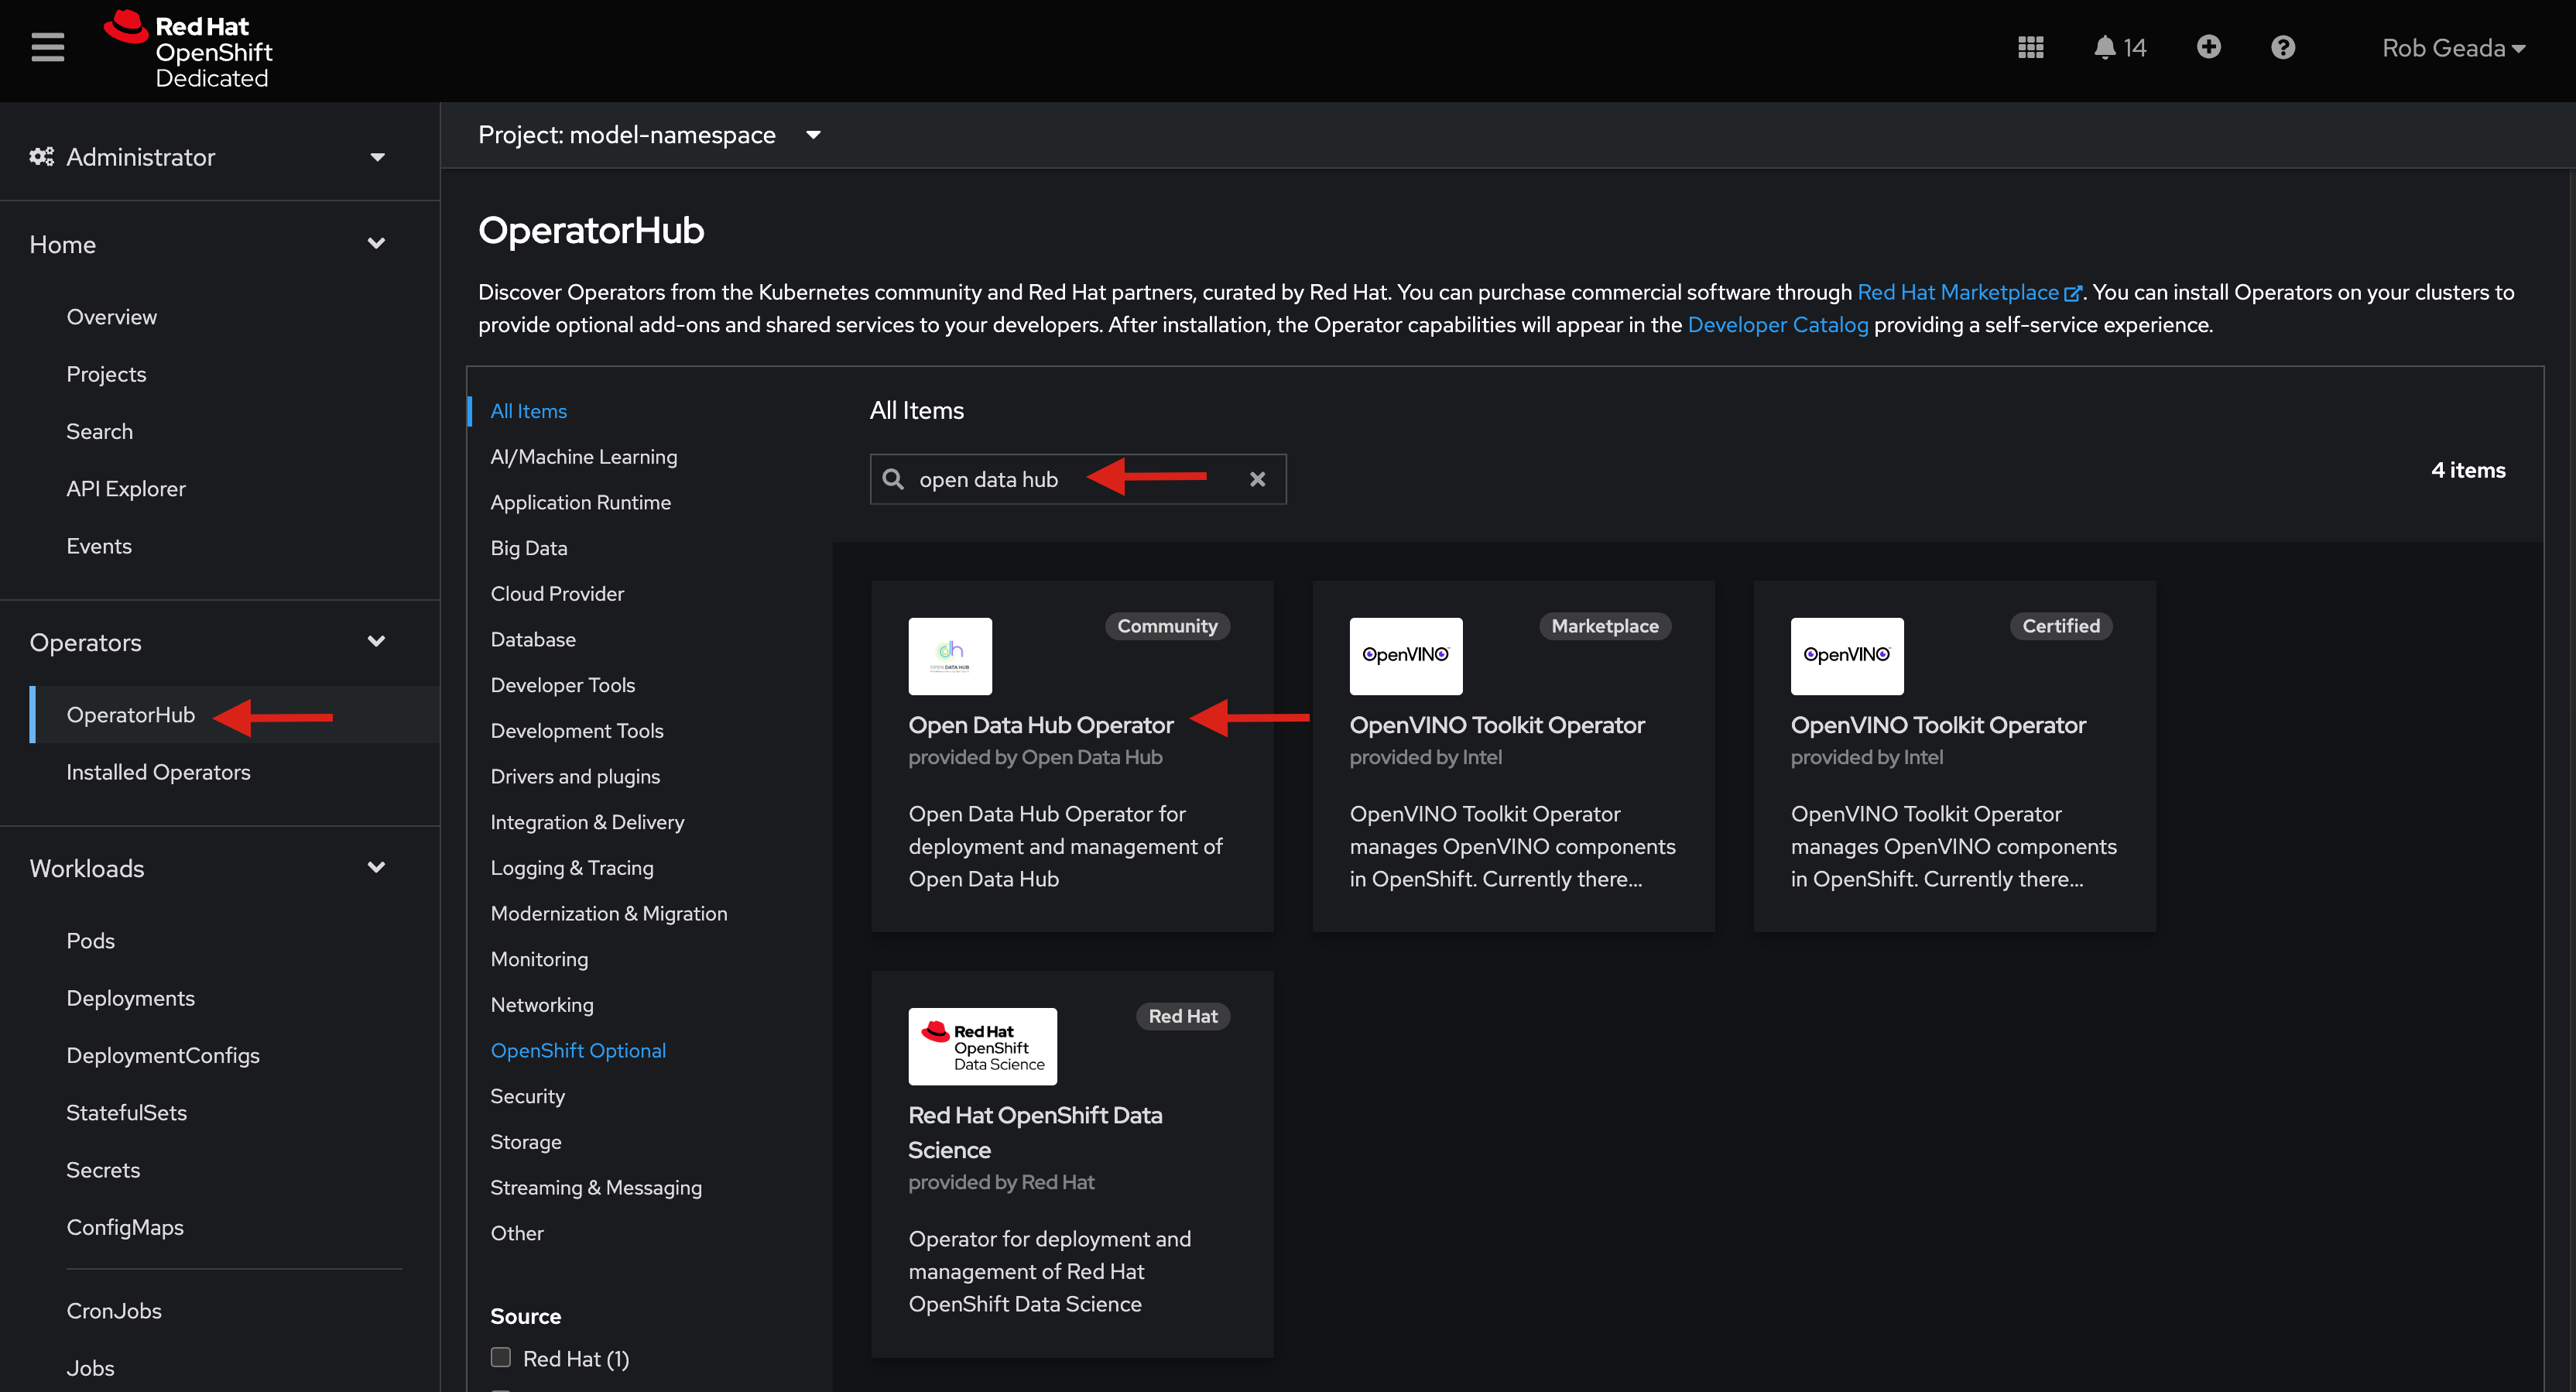
-
Click on
Open Data Hub Operator.-
If the "Show community Operator" warning opens, hit "Continue".
-
Hit "Install".
-
-
From the "Install Operator" screen.
-
Make sure "All namespaces on the cluster" in selected as the "Installation Mode".
-
Hit install.
-
-
Wait for the Operator to finish installing.
ODH v2
|
Since ODH 2.3.0, TrustyAI is included as an ODH component. For versions prior to 2.3.0, use the ODH v1 method. |
If the provided ODH version in your cluster’s OperatorHub is version 2.3.0+, use the following steps:
Install ODH (ODH v2.x)
-
Navigate to your
opendatahubproject. -
From "Installed Operators", select "Open Data Hub Operator".
-
Navigate to the "Data Science Cluster" tab and hit "Create DataScienceCluster".
-
In the YAML view Make sure
trustyaiis set toManaged.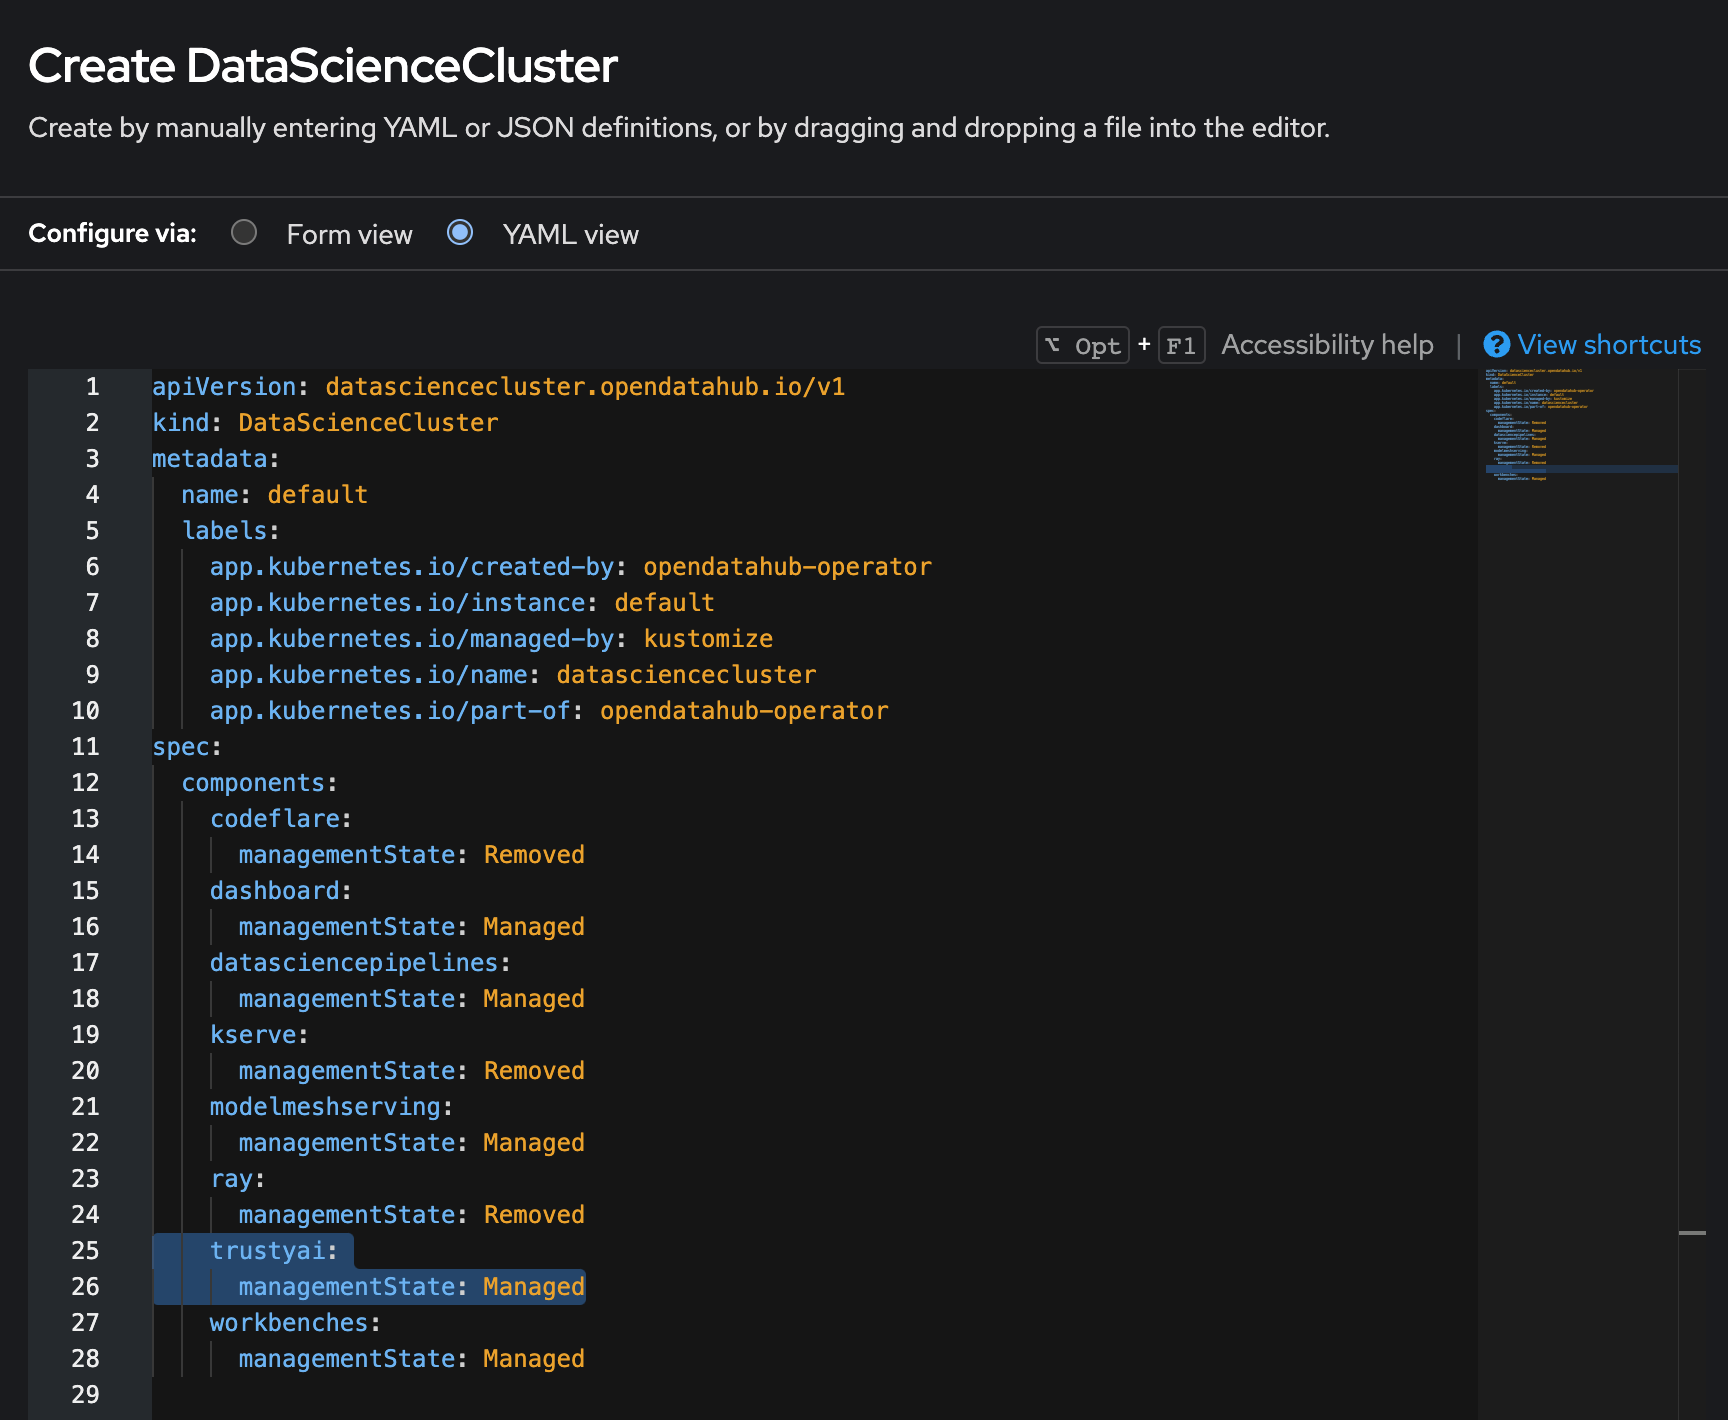
-
Hit the "Create" button.
-
Within the "Pods" menu, you should begin to see various ODH components being created, including the
trustyai-service-operator-controller-manager-xxx.
Install a TrustyAI service
-
Navigate to your
model-namespaceproject:oc project model-namespace. -
Run
oc apply -f resources/trustyai_crd.yaml.This will install the TrustyAI Service into your
model-namespaceproject, which will then provide TrustyAI features to all subsequent models deployed into that project, such as explainability, fairness monitoring, and data drift monitoring.
ODH v1
|
If the provided ODH version in your cluster’s OperatorHub is version 1.x, use the following steps. |
Install ODH v1
-
Navigate to your
$ODHproject. -
Go to
Installed Operators>Open Data Hub Operator>KfDef. .
-
Hit "Create KfDef".
-
Hit "Create" without making any changes to the default configuration.
-
Within the "Pods" menu, you should begin to see various ODH components being created.
Install TrustyAI on ODH v1
-
Navigate to your
$ODHproject.oc project $ODH -
Run
oc apply -f resources/trustyai_operator_kfdef.yaml.This will install the TrustyAI Operator into your
$ODHnamespace alongside the ODH installation. -
Within the "Pods" menu, you should see the TrustyAI Operator pod being created.
-
Navigate to your
$PROJECTproject.oc project $PROJECT -
Run
oc apply -f resources/trustyai_crd.yaml.This will install the TrustyAI Service into your
$PROJECTproject, which will then provide TrustyAI features to all subsequent models deployed into that project, such as explainability, fairness monitoring, and data drift monitoring.